September 21, 2024 | Off-Grid Cooking, Temporal Preparedness | No Comments

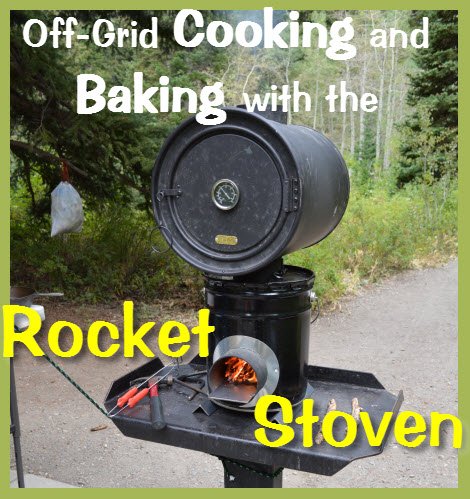
I’ll just start out by saying that I love my Rocket Stoven! It’s a Rocket Stove with a collar that allows me to add my stove pipe oven to it as well, thus it’s a stove and an oven, “STOVEN”. I may actually enjoy cooking with this more than my cast iron Dutch Oven cooking! We saw this demonstrated at a Preppercon Expo and decided to purchase one. (I am not affiliated with the seller or maker of this product). I will include a video of the demo I recorded at the bottom of this article.
The Rocket Stoven comes with these parts:
- Two Metal V strips to set your Rocket Stoven on. They have grooves sanded in the metal so it fits nicely.
- Rocket Stove Bucket itself
- Long Metal Sheet that goes into the fuel tube of the Rocket Stoven. This is what you put your branches and twigs on.
- Two bent “V” re-bar that sit together on top of the Rocket Stoven, making an “X”. This is what you set your pan on.
- Metal Collar with adjustment bolt that can be put on top of your Stoven. This is for attaching your stove-pipe oven on.
A stove-pipe oven must be purchased separately, or you can purchase the Rocket Stoven and the oven in a combo pack. We already had the oven when we bought ours.


It was super easy to get a fire started and going on the Rocket Stoven. It didn’t take much fuel. I waiting until the flames died down and there were hot coals and small flames inside the Rocket Stoven. I have to say also, that I LOVED having my Rolling Kitchen Chuck Box. It was so handy to just grab what I needed with how the box layed out stadium style. If you don’t have one of these for camping or as an emergency kitchen station, I’d make one. (Just click the link above to see my blog post on how to make your own)


Let me just say that the night before this, I had made a Dutch Oven meal for my family. So I used charcoal and lighter fluid to get my coals going and hot.

It took so long that we ended up just setting our Dutch Oven right on our Coleman propane stove. My family was too hungry to wait the extra hour or more it would have taken to have the coals all the way ready and then cook the meal.
But with my Rocket Stoven on the second night, I was able to get my ground beef on cooking in practically no time at all.


I cooked a lean hamburger meat and didn’t even have anything to drain before adding my taco seasoning and corn for taco salad meat. My family loved this meal and they loved how quickly it was ready!

Next, we decided to put the oven on top and do some baking. Since we’d already been using the Rocket Stoven it was very HOT. We had to put the collar on the top and then position the oven on it and tighten it using hot pads. Looking back, perhaps we should have added the oven FIRST before making a fire. Then we could have COOKED on top of the oven and been baking at the same time!
Anyway, we got the oven on and the temperature quickly at 300 degrees and put some cookies in to bake.


We lost track of the time, and checked the cookies about 15 minutes later and they were burnt (I didn’t take pictures of them, it was sad). So we put the rest of what cookie dough we had in there and this time we WATCHED the time and took them out just how we love them. YUM!


My overall review of our Rocket Stoven is a thumbs up!
- It was priced really well
- It is super versatile in that I can add my stove-pipe oven on it and use it.
- It didn’t use much fuel and was quick to cook and bake things.
- It’s definitely not for the backpacker to use, and it’s not light. But for camping and emergency preparedness – it’s great!
- Cost is less than $100. which is very well priced compared to other Rocket Stoves on the market.
- Perhaps a skilled handyman could research and build one of these himself, but I prefer to just buy it already made with all the components needed.
- You can purchase this Rocket Stoven, or the Stoven and Oven Combo here at Deluxe Camping.
Below is the video I took of it being demonstrated at the Preppercon Expo we went to earlier this year.
Read about MORE Off-Grid cooking options in our DIY Cooking without Electricity post. ????
Camping Stove, emergency cooking, Outdoor Cooking, preparedness, rocket stove, Rocket Stoven, Stove Pipe Oven

